 Skip to content
 Gallery
Photo of the Artist
Les Bundy
The photo shows the artist at Regis University, Denver, during a summer workshop on Art and Theology. He is giving a painting demonstration while wearing a Mickey Mouse t-shirt. If you look closely, Mickey Mouse is wearing a Les Bundy t-shirt within the design on the shirt.
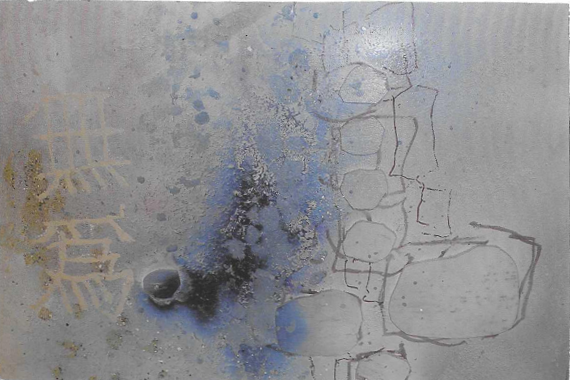
Wu Wei
24 x 19 inches painted in 2016
Step-by-Step Instructions
- Use quarter inch plywood, cut into rectangles, glue them onto your painting surface.
- Spray paint the initial background color.
- Use felt tip markers to add linear designs over the surface.
- Paint dark and light blue areas with a brush.
- Paint Chinese Ideograms with a brush on top of the surface.
Tao Gives Birth to the One
2015
Step-by-Step Instructions
- Spray paint hardboard for the background.
- Randomly drip white paint over the surface.
- Use a brush to add linear elements as desired.
Unity in Cosmic Order
2014
Step-by-Step Instructions
- Spray paint hardboard with yellow and brown colors.
- Paint Chinese characters with a brush.
- Drizzle white paint over the entire surface.
- Paint a white tree on a piece of Plexiglas, cut out the tree shape.
- Attach the Plexiglas tree onto the painting to create a layered, floating effect.
Tao Named Tao
26 x36 2007
Step-by-Step Instructions
- Spray hardboard with different colors to create a mystical, blended effect.
- Paint Chinese characters (opening lines of the Tao Te Ching) with a brush.
- Paint tree forms onto the surface.
- Cut out a white tree from paper, glue it onto the surface to add layered dimension.
Northwest Fantasy
2016
Step-by-Step Instructions
- Paint hardboard to create a mystical seascape.
- Paint background buildings to appear “floating”.
- Paint a red building to float over all other elements.
- Cut an opening in the hardboard and insert a dollhouse window into the red house.
- Paint the boat sail directly onto the surface.
- Carve a boat hull from wood, glue it onto the surface to complete the 3D effect.
Enigma
21 x 16 2016
Step-by-Step Instructions
- Use spray paint and spatter techniques to create a mystical space on your surface.
- Paint a house shape with a brush.
- Cut out a tree shape from white paper, glue it onto the painting for added texture.
Enigma II
24 x 36 - 2016
Colorado Winter
20 x 16 2013 wood block print.
Step-by-Step Instructions
- Transfer a basic drawing to two identical woodblocks.
- Carve the first block, leaving mountains, trees, and buildings raised.
- Ink the first block with dark blue ink and print onto light blue paper.
- Carve the second block to leave snow caps and selected roof/tree tops raised.
- Ink the second block with white ink, print onto the previously printed paper to add snow caps and highlights.
New Beginnings in sepia
20 x 16 - 2014 mixed engraving and etching
A New Beginnings in black and white
20 x 6 - 2014 etching & engraving.
Step-by-Step Instructions
- Use a copper plate, apply acid to selected areas to etch.
- The longer the acid sits, the deeper the etch (darker in print).
- Use engraving tools to add lines to the plate after etching.
- Ink the plate (sepia or black ink), wipe off excess.
- Use an intaglio press to print onto paper.
- Result: a deeply etched, durable plate that can produce many prints.
Monoprint
16 x 20 - 2014 engraving and drawing
Step-by-Step Instructions
- Cut basic shapes and lines into a copper plate using engraving tools, sandpaper, and scrapers.
- Print using an intaglio press onto paper.
- Once printed, use markers, crayons, or other media to work over the print.
- Result: a one-of-a-kind monoprint, part print, part drawing.
Baroque in Black and Gray
14 x 11 - 2000 woodcut and collage
Step-by-Step Instructions
- Draw an abstract design on a wood block.
- Cut away all areas around the design, leaving the design raised.
- Apply ink to the raised design.
- Roll random blocks of yellow color on a sheet of paper.
- Press paper onto the inked woodblock to print.
- Use a second carved block with a different design, ink in another color.
- Print again on the same paper for layered color and design.
